How to Hook Live Bait
Before I get into the process of how to hook live bait, specifically worms, I want to tell you this. You do not need to put an entire worm on your hook, especially earthworms. Most of the time when I’m fishing with worms, I use half a worm at a time. I do this because: a) they last much longer, b) you get a lot more out of each worm, and c) in most cases, any more than half a worm and you’re pretty much feeding the fish at your expense, especially when panfish are around.
You can cut a worm in half, put it back in the box and use it at a later date. It will still be fresh and effective. I’ve kept worms in my fridge for two months and they were still as fresh as new. With that said, rigging your worm onto your hook is very simple. Whether you’re fishing with or without a float/bobber, there are two basic ways to do this. Both ways work for both fishing techniques. Let’s get to it.
Rigging Live Worms
Step 1: Using scissors or your own fingers, cut a worm in half.
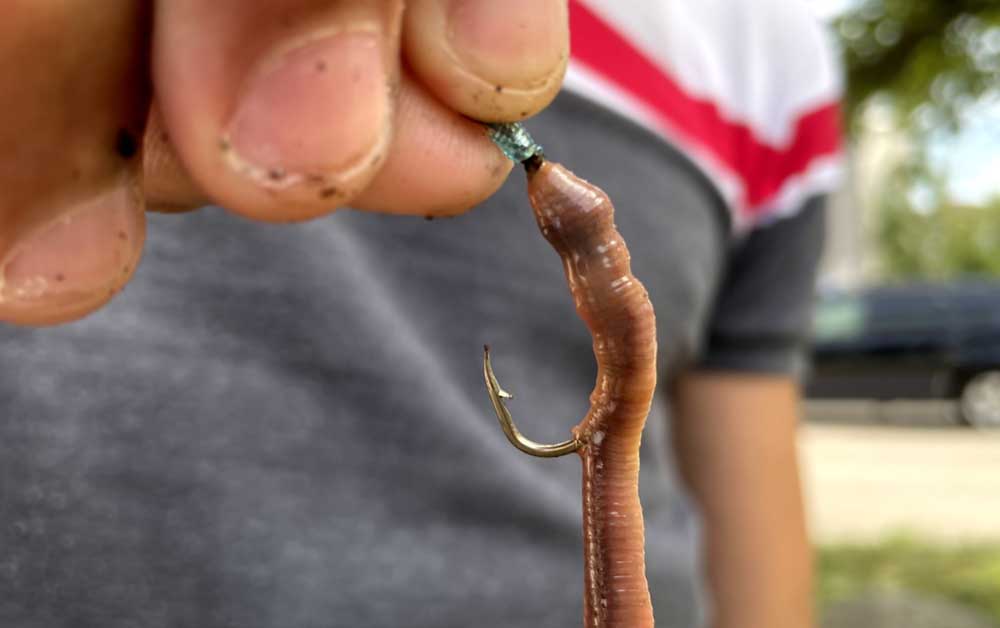
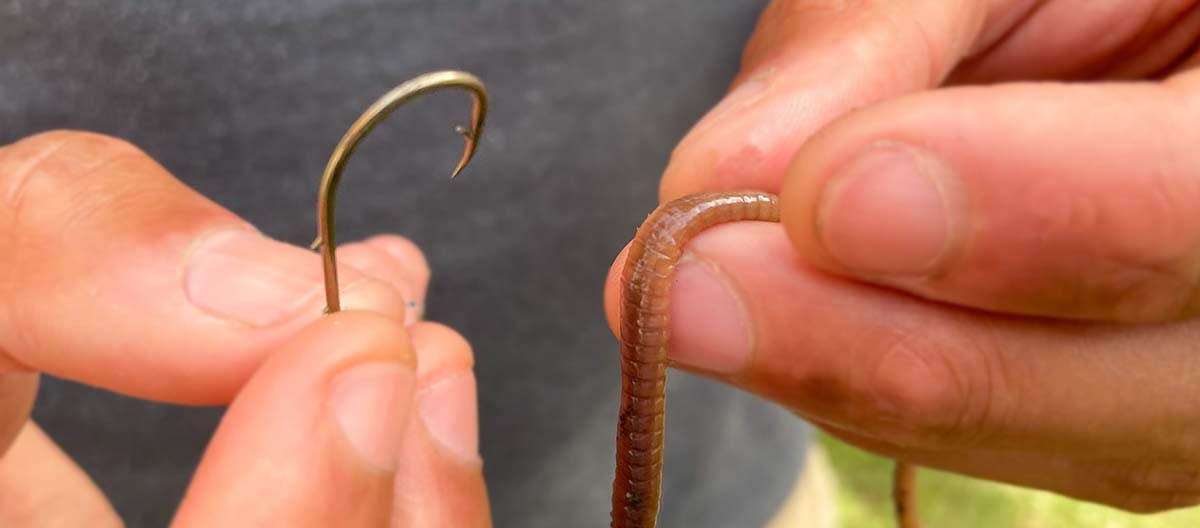
Step 2: Take a half worm and starting from the end that was cut, feed your hook down the center of the length of the worm.
Step 3: Once you have covered ¾ of the hook with the worm, poke the point (and bend of the hook) out the side of the worm.
Step 4: Now push the whole worm up towards the eye of the hook. You want about a ½ inch of worm freely hanging just below the bend of the hook.
Step 5: If you think you have too much of a “tail” dangling, you can cut it off. Alternatively, you can take the point of your hook and poke it all the way through the side of the worm, then slide it onto the hook. Repeat this until the length of the tail is to your liking.
Step 6: Cast your line into the water and catch a fish.
Note: This way works really well with the “bait holder” and “j-hook”

Alternate Rig for Live Worms
Step 1: Again, start with half a worm in your hand.
Step 2: Instead of feeding the hook down the center and through the length of the worm, start at the cut end of the worm and poke the point of the hook all the way through the side of the worm.
Step 3: Push the worm up onto the shank of the hook and spin the worm around 180°, so you can poke the point of the hook through the side of it again.
Step 4: Repeat this action, bunching up the worm on the shank and bend of the hook, until you have about ½ inch of tail left hanging below the bend in the hook.
Step 5: Cast your line into the water and catch another fish.
Rigging Minnows
Tip: Always use a small, thin wired hook when fishing with live minnows. The smaller the hook the smaller the hole in the minnow, increasing the chances of your minnows staying alive and on your hook for longer periods of time. Using a smaller hook will also allow the minnow to wiggle and move around more naturally. I like to use anything from a #6 to #12 hook, depending on the size of the minnow I’m fishing with.
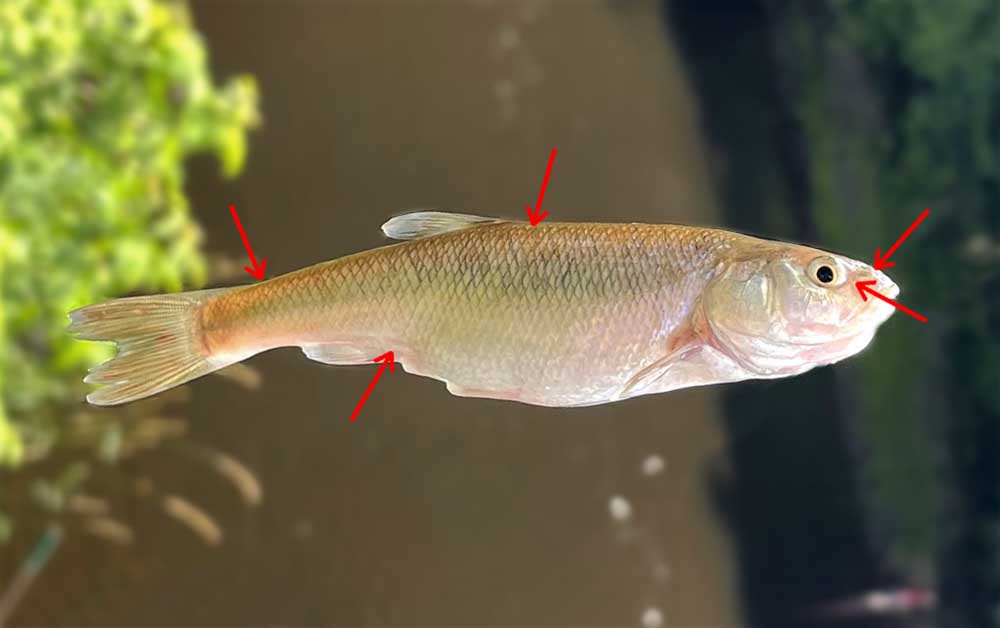
There are five ideal points on a minnow to pierce your hook through. These points ensure your minnow stays alive and active for as long as possible. They’re very effective with all types of fish species and work really well when vertical and float/bobber fishing.
Where to hook a minnow for float and vertical fishing:
∙ The meaty part of the tail
∙ The upper part of the back, just in front of the dorsal fin
∙ Upside down just behind the anal vent
∙ Just in front of the eye poking the point of the hook out through the mouth
∙ Place the point of the hook in the fish's mouth and poke it up and out through the nostril

Fishing Minnows Without a Bobber
There's basically two different ways you can fish a minnow without a bobber.
Casting and Retrieving
This involves casting out your bait and reeling it back in, sometimes dragging, bouncing, lifting, and twitching it off the bottom. You can also pull it through different levels of the water column depending on how much weight you’re using and your bait retrieval speed. It all depends on how active and aggressive the fish are, as well as weather and water conditions. The best way to keep a minnow on your hook when casting and retrieving, is to pierce the hook straight up through both lips of the minnow. You may notice that your minnow doesn't stay alive for very long. However, don’t let that concern you. If you’re constantly mimicking its natural movements as it moves through the water, fish won't notice the difference. This method allows you to use dead minnows and still be extremely effective.
Vertical Jigging
This is when you drop your line directly below you. You can let a live minnow do the work while twitching it every so often. Get yourself familiar with how it feels when it’s wiggling and jerking around on its own, so you can identify the difference between your minnow moving and a fish taking your bait. With dead or lifeless minnow, you can also jig, lift, twitch, and bounce it up and down in one spot, whether that's on the bottom or anywhere in the water column. It doesn't always have to be bouncing, but you shouldn’t let it sit too long without movement. Play with different variations of jigging and pausing. Vertical jigging is normally done off a dock, side of a boat, a bridge, off a ledge in deep water, ice fishing, etc.
Minnow Presentation
There are two different ways to present your minnow in both cases.
Method 1: One way is with the hook of your choice and a single or multiple split shot(s), depending on how much weight you want and how fast you want your minnow to sink. Play with the position of the split shots. You can put them right up against the eye of your hook or between 2 to 4 feet up your line. Each position will have a different effect on your bait, so experiment with them. Compare the action each set-up gives your bait and see which you like the best.
Method 2: The other is by simply hooking your minnow onto a jig head. This can be very effective especially when jigging, bouncing, twitching, and dragging it along bottom. The more you fish with a jig head, the more it will prepare you for fishing with artificial soft plastic baits in the future.
